farmlassie

A Cringey Medieval Dress Tutorial (with Sarcastic Commentary)

June 22, 2020


A wonderful day to you all!!

In today's workbasket post, I'm going to bring a dusty mothball filled post that dates back to....a long time ago.

Back when I was playing around with blogging, I wanted to make a lot of tutorial like posts. Especially for things that I wanted to learn how to do but could never find instructions for. No one could really give a tutorial on how to make a medieval dress in a cheap manner, and so I was left to figure it out on my own. I kept a record of how I did it and proceeded to write a post for it. That never saw the light of the internet until now...more for the lack of pictures.

Now, I have realized that there is a lot of things wrong with this post. I warn you now, this post is much more arrogant than you're used to seeing from me (I mean, I know I have a streak of pride a mile long and this post will prove it without a doubt). But I have decided to publish it in it's raw form just for the pleasure of shredding it to pieces.

So without further ado, let's get started!


I'm sure that every girl wants at least one medieval dress in their closet to wear to Ren Faire, right? *bold of you to assume that Catherine* I know I did. *really? wouldn't have guessed* However, one look at some of the prices that ready-made dresses were going for convinced me that there was a cheaper alternative (break out the sewing machine!)
The question was: how to make one?
My pattern search quickly became a source of frustration. I couldn't find any that I like *lies, you were cheap!* , (with the exception of Laura Marsh, but those come from overseas…). I knew there had to be a way to create my own SOMEHOW!
Turns out, Pintrest saved my head from blowing off.
No, I did not find a how to guide (I wish). Instead, I discovered from (looking at my collection of medieval costume pins) that a particular style dress looked an awful lot like a princess dress. I managed to get a hold of pictures of one such dress of front and back, and, with a princess dress pattern I already had, decided to draft my own medieval dress. *otherwise known as knockoff* 

The proved a little daunting, since I had NEVER drafted anything in my entire sewing career, at least not to the extent that I ended up doing.
The material I used was a medium heavy cotton blend. I was pleasantly surprised with how well it draped, but for your sake, I would go for a medium cotton. *rolls eyes really Catherine your naive arrogance is endearing* 


You will need: at least 6 yards of main fabric, 1 yard of accent fabric, ¼ yard heavy cloth or leather, thread, eyelets and cording. Follow the patterns instructions with the following exceptions:
1. Cut the dress a size bigger than 'your' size.

EDIT: Don't do that for the entire dress. Only do that for cutting out the BACK SEAM. Otherwise, the dress won't fit, especially at the shoulders. 

2. Instead of adding a zipper, simply sew the entire back together.
3. For the eyelet tape: measure from the middle of your bust to 1” below your waist. Add an inch, and then cut two lengths of that measurement of the heavy cloth. Roll over the cut edges, and hem them. Add eyelets at each end and then every 1-1 ½” on both sections of tape (think shoelace holes). Baste the finished tape to the back (remember to put the top at where the middle of the bust will be, and the bottom at the waist) *gee thanks Young Catherine I wouldn't have known if you hadn't told me*  with the eyelets facing out. Sew the sides on as normal.
NOTE: I used single-biased tape originally, and it didn't hold the eyelets very well.

EDIT: I actually used grommets originally, (NOT eyelets) and not only were they a pain to put in, the tape didn't hold them. I've since made actual eyelets and they hold a lot better. And, I would actually recommend a medium-heavy fabric for the tape because leather would be hard to sew in. And, for future projects, I mayyyy stick the tape a smidge higher...actually more like a whole inch higher.


4. Before sewing the hem, check the fullness of the skirt. The princess pattern may not have the really wide skirt circumference that is characteristic of a medieval gown. *MAY NOT?? GIRL IT DOESN'T* Add gores for additional fullness. I was able to do that with the extra fabric left over from the dress. *what, no tutorials for the gores??*  Finish dress accordingly, using cording as the 'laces' to tighten up the dress. *slaps head. Did I seriously not leave instructions for this??*


On my dress, I created the sleeve band, bottom of the sleeve and sleeve flaps from scraps. Because of the difficulty that I had with that, I would recommend that you find a dress pattern with a long sleeve, and add the band and sleeve flaps yourself. That whole sleeve pattern was me flying by the seat of my pants....er skirt.  However, if you are adventurous, I can give you some tips on how to make your own version of these sleeves. The sleeve flaps are quite easy. It's just a trapezoid of main on a slightly bigger trapezoid of accent fabric, and hemmed accordingly. If you wish a lower sleeve that look similar to mine, look for a bracer pattern "Look for a bracer pattern"? Come on, I literally just wrapped a scrap of fabric around my arm. and customize it yourself. Take in mind, bracers are not meant to go past the elbow, so having at least ¾ sleeves is essential if you wish to go this route. Use the sleeve band of accent fabric to hide seams.


EDIT: *sigh* where to start??? There is literally hardly any information worth saving out of this step, except for making the sleeve flaps.  And leaving out half the instructions for finishing the dress? Obviously, Young Catherine must have thought she was writing to a group of old lady seamstresses who knew what they were doing...


As for colors, it is up to you. If you wish to be historically accurate, go for natural colors or colors that are achieved with natural dyes. If (like me) you just want a costume, go for colors that suit you. Jewelled belts and circlets are the most common accessories with a medieval costume, followed by French hoods, snoods and circular medieval veils.

EDIT: I had originally intended to make a belt and a veil to go with this dress, but as you can see, I have not done so yet. Probably just as well. Though it does seem to be missing something, doesn't it?  

*shifts eyes*

Are we done?

*breathes sigh of relief*

Man, was that a mess. Thank heavens I didn't start blogging in those early days. I don't know if anyone could actually stand me.

I do hope that there at least was some entertainment value in all of this, if not actual valuable information. All I can say is that when I actually DO draft a pattern, I hope to find people much more knowledgeable than myself.

Old-fashionably yours,

Catherine 

Abstinence

In the Kitchen: An Attempt at Unconventiality Takes a Bitter Turn (quite literally)

March 16, 2020


They say "curiosity killed the cat", and in this case, I can corroborate with that.

It all started on Ash Wednesday when I went veggie shopping. I was bound and determined to put in different vegetables than our usual fare, in accordance to my pursuit of Lenten abstinence.

I had my eyes set on one particular vegetable that I'd been seeing in GIANT, a little red cabbage like thing called a radicchio. Going off of the description in the store, it was supposedly good in salads or cooked in pasta dishes.

Oh, and it also said it was bitter.

I had originally intended that the radicchio be sliced and put in the salad. One mini-bite caused immediate regret and decided to spare even myself from that torture.

Hence, it was tossed in a plastic bag until the next Wednesday.

Looking up the vegetable itself, I discovered that it was more like an endive rather than a cabbage and that cooking it helped with some of the bitterness. And that it was prevalent in Italian cooking, for some reason. Pasta salads seem to be a favorite pairing, so I thought about that.

And then I looked in the fridge and discovered...celery-flavored pasta, mac and cheese, and two different styles of spaghetti, in addition to some leftover pasta from a casserole I had made for a Meal Train meal. All from the last week or so.

Clearly, there needed to be a break in the pasta regime.

So, it was time to go recipe hunting. I concentrated on radicchio recipes and came up with this one: https://www.kitchenkonfidence.com/2016/07/baked-cheddar-polenta-grilled-brats-radicchio. By sheer providence, I discovered I had all of the ingredients, as long as I subbed out the brats for some Bob Evans ground sausage, and regular cornmeal for the polenta.

I started on the polenta first. I've made stove-top polenta before and remember how time consuming that was. And so I was looking forward to trying this oven method.

I will admit, it did take more than one stir before it really set up well...contrary to what the recipe says.

I will say, I much prefer this oven method to the conventional method. Doesn't quite require as much scrutiny.


Stirring the polenta. It looks pale because of all the milk but it did get nice and yellow later
Copyright: Catherine Hawthorn


Next was the preparation of the sausage, by setting up the cast iron pan to warm and cutting the plastic off the sausage round to cut it.

And then turning back to seeing the pan smoking merrily. Cause dum-dum put the burner on HIGH rather than LO like she was supposed to. *sigh*


Once the sausage was pretty much done, I addressed the radicchio. The recipe had said to grill it but even though it was about 50 degrees outside, there was no time for me to drag out the grill just for that. 

Pan-frying until charred as the recipe said was sufficient. Right? 

Right......

Even for the adventurous ones of us, the centers of the leaves were just too bitter for us to swallow. The charring was only surface level and so when the leaves were peeled back, it was revealed that heat from the pan had not wilted them as much as I would have thought. My dad suggested trying to cook them down further, as the red parts were okay. 


Wilting the rest of it in the pan with the sausage grease. Not that it helped much.
Copyright: Catherine Hawthorn

Even though cooking them down helped a little, and pairing it with the rest of the meal helped a little more....the radiccho proved to be too bitter for any of us to enjoy. We whole-heartily agreed not to keep the leftovers.

Lesson learned: if the grocery store says that something is bitter...believe them. 


The complete meal

Looking back at the recipe, I realized that I made several mistakes. One was that I should have tossed the radicchio in lemon juice....which may have eliminated some of the bitterness. I also forgot to add the cheese and the finishing ingredients to the polenta mixture. Although, I don't think it really needed it that much - the fresh garlic helped flavor it just fine. It had enough dairy in it as it was, actually.

All in all, the radicchio experiment turned into a bittersweet disaster....and not one that I plan on repeating any time soon. I mean, the only good I see in this vegetable is that it could be a suitable penance-food and that's it. And even an abstinence-lover like me draws the line at this one.

Now it is your turn! What is the most unusual vegetable you've eaten? What sort of foods have you tried that you've heartily despised? Chat with me in the comments! 

Old-fashionably yours,

Catherine

farmlassie

Workbasket Post: The Abandoned Flannel Jumper

February 03, 2020


Hey y'all!

I had NOT intended to make a post about this particular jumper and as such, I didn't take any pictures of the sewing process. After all, it was supposed to be one of those quickie projects that was going to be a blip mentioned in passing.

Then THINGS started happening, and it was too good NOT to share.

So, here we go.

I started this jumper a few years ago - I want to say I was still in college at the time. At the time, I really liked jumpers and my last one had been recently relegated to the "daughter clothes bin". I also wanted lighter fabrics since most of my clothes are, in fact, dark. And winter skirts were needed.

Hence the buying of two pink flannels - one with a diamond pattern and one with pink and yellow skyrockets on them. I made one jumper with the pink diamonds (still have it, still wear it) and started the second one. Everything was cut, the bodice and skirt were constructed and sewn together. It even had a hem. All it needed was a zipper, the facings and the straps and it would be done.

But for some reason, the project was...abandoned.

*cue the sad music*

I remember having to buy another zipper for it, I think because the first one was so short. But I still didn't pick it up again.

Until January 2020, when I took it out of my sewing cabinet one fine Wednesday that I was off from work.

The problems began immediately when I realized that I was missing half of the instructions for the "View B" I was attempting. I then remembered that I had been following the instructions for View A because of this, but the instructions had pretty much run out at that point.

No trouble, I said to myself. I know how to do the rest of the steps, it shouldn't be that hard. I have, after all, been sewing for over a decade, I should know what I'm doing.

Lies. All lies.

I made a trial fit before I put in the zipper and found that something was really wrong. It was miles too big in the waist.

It was then that I realized that while I was sure I had cut out the correct pattern pieces, I had forgotten to put the darts into the bodice....which would have shortened the waist by over 4 inches.
So, the bodice had to be ripped off the skirt and the darts put in.

That's when I discovered that the bodice wasn't cut right. It was cut straight when it was supposed to be pointed on the darts.
(oh trust me, it only gets better from here)
I had to change the design of the darts slightly in order so that they didn't curve on me. Wish now I had gotten a picture, but it wouldn't have looked flattering at all.

So then, the bodice was darted and the skirt re-gathered and put back on. I then binded the seam with some flannel scraps so that I wouldn't have any fraying issues.

So then, it was time for the zipper, which was an invisible one. I personally prefer them to the regular zippers because they look much nicer.

That's when I discovered, to my chagrin, that my Phaff machine didn't HAVE an invisible zipper foot. Stupid machine was from the 80s and I suppose they didn't have invisible zippers then.

So I had to go use my mother's sewing machine. Except that it was almost inaccessible because the table it was on had Blue Couch up against it. (I'll tell you more about that Blue Couch at another time).

I said "almost" inaccessible. You could use it if you knelt on the couch...you just couldn't reach the foot petal.

So, what does an enterprising girl do?

Fish out the petal, plug in the machine and squeeze the foot petal with her right hand and guide the fabric with the left. Rather efficient system.

Of course my mother doesn't notice my rather unorthodox method until I'm well over halfway putting the zipper in. She asked me why I just didn't move the couch.

Now you tell me, why would I take the risk of moving the couch the wrong way and knock it off it's wooden blocks just to get to the machine for five minutes and then have to move it back? Too much work, if you ask me.

Anyway, after a moment of panic when I thought I had put the zipper in backwards (the opening wasn't big enough for the zipper to flip out, it was fine), it was time for another fitting.

I'll now refer you to the following Hangouts conversation I had with Lia....


My mother did indeed save the day by pinning two darts into the back to take up the excess space. She had asked to see the pattern envelope before doing so to see the design. Not thinking much else, I put it back on the bed. 

It was when I was basting the dart tucks in to sew them that I looked at the pattern envelope again. And made a horrible discovery. 


.....why Catherine? Why??? 

I guarantee you, in my youthful arrogance, that I cut it the smallest size I could and planned to "fix it" later on. This was before I knew about pattern scaling - thank you historical costuming YouTubers. 

So with the dart tucks put in, it was time for another fit. 


 Another couple of hours, and here is the finished product:


I really like how long it is - it makes me feel really feminine. I'll definitely be wearing it around the house this winter :)

Now it's your turn to chat! What sort of abandoned projects do you have lying around? Do you sew, and if so what is the latest project you've done? Tell me in the comments below!

Old-fashionably yours,

Catherine

farmlassie

Operation Vintage Makeover: Carpet!

June 04, 2019


A wonderful morning to you all!

I now take you to the major landmark in this renovation....the carpet change!

The carpet saga actually technically started back in the summer of 2018. Knowing that I was going to have to foot the bill for the carpet, I needed some sort of estimate so I knew how much to pull out of my paycheck each month.

That first consultation was....interesting. I had taken my brother Anthony with me as my dad was unavailable and I was NOT going to deal with salespeople by myself, thank you.

Well, we started in the luxury section by mistake and I have a feeling that we ended up making a spectacle of ourselves. Oh well, at least I managed to walk away with some idea of a price point.

So this project sat for seven months as I earned the money ($700), cleaned out the room and painted it. Once the paint was on the walls (and a month delay to sort out some life-y stuff), it was all systems go to get the carpet down! 


Carpet - October 20, 2017


Seeing as how I wasn't exactly impressed with the service of the initial carpet store (all embarrassment aside of course), my family and I investigated two other carpet places during the beginning of April. I took a lesson that I had learned from car shopping with my aunt to make them give me the numbers and I'm glad I did.

The one shop quoted me $300 dollars over my budget. The second one was local (local as in, he knew practically everyone on my whole street!) and quoted me close to my budget for the same carpet. Actually, he was extremely nice and swallowed some dollars off the actual price so I could still get a good carpet at my budget.

No brainer, right?   

Anyway, so the carpet got scheduled for May 1, as the carpet had to be ordered from the factory. We knew we wanted it down as soon as possible, and that I was going to be away at my aunt's during that time. Which worked out for the best, because I probably would have been sleeping on the couch.

Well, it got moved up a day! Our carpet guys had to rearrange a schedule, so we gladly took the earlier date. I was still going to be away, but whatever.

In the few days before I left, I cleared out everything except my bed. Let me tell you, it's very eerie sleeping in a practically empty room, even if it's one that you've lived in for almost 20 years.

The morning before, I stripped the bed and took off the mattress and boxspring. Then I whipped out my camera.....


Full Carpet - April 29, 2019

And behold! The Peach Monstrosity in all it's faded and stained glory!! 

This floor, I tell you. I can only guess that it was the original carpet that was put down in the 90s. As I was little when I moved it, I can't give you really a sense of how the condition was. All I know is that most of the stains (including paint stains, water marks, and others) came from my verrrry long tenure in that room. I hated this carpet as a kid - who puts a color like bright peach on a floor anyway???

As I snapped away, I got a full sense of how damaged the carpet had become over the course of almost 20 years. And my goodness it was worse than I thought....


Carpet Detail - April 29, 2019

See that dark stained "path" in the above pictures? That stretched from the door to the head of my bed. What you're actually seeing is wear, not dirt. Even though the floor isn't vacuumed at all, it would not have made any difference. And when the vacuum doesn't improve things, you know it's bad!

It's not as easy to see in these pictures, but there are marks where all the furniture was, and there are also a lot stains in the area where I had my night table. You know, from stuff spilled there in years past....


Closet Carpet - April 29, 2019
.

The best piece of carpet probably was in the closet. That's about as close to the original color as I'm ever going to see it. Still ugly, in my unbiased opinion.

And yes, my closet is that small. I had the choice of either having a small room with a big closet or a big room with a small closet as a six-year-old. Not exactly thinking about the fact that my clothes storage would be a factor in the future (or frankly, that I was going to be staying there for all the rest of my childhood....), I chose the latter. In a way, the space was great - even as a kid, I had a lot of stuff. But.....not having room to hang up stuff can be a bit annoying.

But I digress.....let's get back to the carpet.

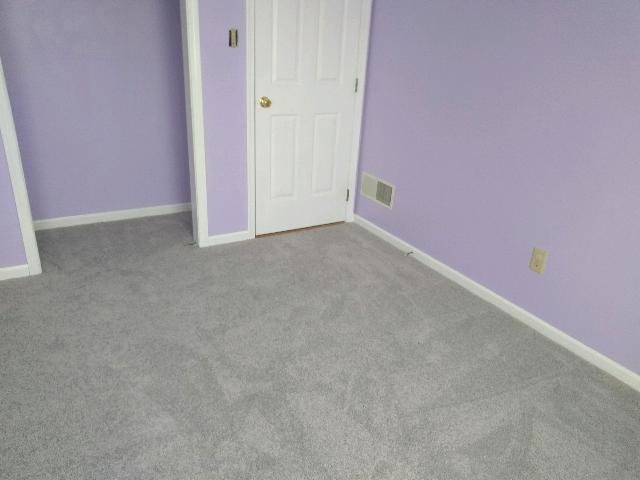
I had chosen the color for the carpet during the first visit to the carpet guys - a beautiful solid color called Brilliant Gray. Even without a sample to place down, I knew that would be smashing with the purple walls. And gray (or is it grey? I guess the former, since we're not British exactly) is one of those colors that doesn't go out of style and it will go with a lot of color options.

As I couldn't be there to witness the installation, I asked my mother to send me pictures of the completed job. In a way, I wish I had been there....I really wanted to see that horrid mess go out the door and hand my hard-earned cash over to the guys myself.

But, the pictures were worth it.....


 So much so.....


That I'm making you scroll for them......


Almost there.....


 TA DA!!!!!


Carpet Detail - April 30, 2019

According to my mom, the carpet guys were a little startled. Purple isn't a common color for them, and they had just completed another job with purple carpet that morning. So when they saw my purple walls....they weren't sure if the carpet color was supposed to be gray or purple!

Mom set them straight though, much to my relief. Purple carpet would have been a bit much, don't ya think?


Full Carpet - April 30, 2019

When I came back for a brief visit, I took a feel of the carpet. It was sooooo soft!! Which was another reason why I was glad the other was gone - no scratchy rough carpeting to get a friction burn on.

I do not regret it. I'm so glad that I bit that bullet and had the carpet replaced - even if it meant delaying paying off some rather persistent loans. It had to be done, and it gives me such peace of mind. It really cements that a change is happening.

The fresh start is really happening, y'all. And I couldn't feel any better about it.

Old-fashionably yours,

Catherine

farmlassie

Operation Vintage Makeover: Paint, Part 2

May 28, 2019


I say, this post has been a long time coming!

This is probably the most stalest excuse in the entire world, but I'm afraid the outside world held me ransom for a good few weeks this month. Pressing engagements in my family and a rapidly approaching moving date for some members have left me rather winded with little to no time to actually catch up on writing. I have taken steps to rectify the situation by stepping back from my team blogs this summer, but it already promises to be a very busy one for me....so we'll see how this goes.

For those of you who commented on my "Assumptions about Me" post, please see my other blog, The Rebelling Muse, for the answers to them! As of right now, the post isn't up yet, but should be (barring any and all disasters) by this weekend.

 So....where exactly did I leave off of this story?? 

Oh yeah...when I had purchased the paint sample of Sassy Lilac from Lowes....


The next step was to actually paint a small section of the wall so I could see how the color would look. Because really, who wants to repaint a wall a million times because the color winds up looking...not as we expect?

I chose to put up the first sample behind my door so that it was easy to hide. And it was the darkest corner of my room. If the paint was going to be light enough there, it would be light enough everywhere in the room.


East Wall, February 12, 2019
This first picture is going to require some explanation...


 On the left side is the first paint sample that I threw up on the wall (well, not threw exactly, more like brushed. You get the idea).

You see those purple marks on the wall on the right side...yeah, where that blinding light is? 

Those are marker streaks. Purple marker streaks.
From my first attempt to put color on the walls. 
Which was when I was...seven. 
Yeah, that worked out well. 

As you can see, the purple fixation came much earlier than high school...

Anyway, moving on! 

So, the paint sample dries pretty quickly, and well....let's just say that I had heart-eyes. I loved it - it was bold and beautiful and ME on so many levels. The squealing was close to fangirl level. 

Mom, in perfect caution, told me to put a few more samples on the other walls to see how I liked it. One of them is here below:


West Wall, February 12, 2019


Well, dear readers....there was no going back. I was SOLD. I was practically euphoric, I loved it so much.

Now remained the question of actually getting the stinking paint...and getting more of the room packed up.  I figured that I would get the paint once I finished that.

A few days after the samples were painted, my father surprised me by saying at the Saturday breakfast table that we were going to work on my room that day. Meaning, taking out stuff (like the busticated closet door, furniture etc.) and the walls would be prepped...and the paint purchased. Of course, I would have appreciated it if he had given me 48 hours notice rather than 48 minutes....but hey. Beggars can't be choosers over free help.


East-West Walls, February 16, 2019
By the end of the day, we got about half of the stuff removed and all of the walls spackled. Soooo much spackling. I had so many thumbtacks and nail holes that in some sections it was more holes than drywall.

Now I sympathize with the landladies of Patty's Place worrying about the 5 year old wallpaper being full of holes*.

And then that afternoon, we got one gallon of Infinity Valspar paint with the Sassy Lilac color and one small container of white semi-gloss paint for the trim. 

The trim paint ended up being a bit of a rodeo. 

You remember that originally, I wanted cream trim to go with the cream furniture right? Well, once we realized that the new dark furniture was going in, we scrapped the cream because it wouldn't look right. So Mom and Dad figured on getting purple trim paint. I wasn't wild about the idea because I thought it needed an accent color, but I had to pick my battles. Dad was paying for the paint, after all.

Well, God must have heard my prayers because the clerk at the counter made the "mistake" of giving us white trim paint. I caught it at the counter, but....I didn't say anything (except to say the fateful yes in confirmation of the white color before Dad could figure out what happened). He didn't find out until several hours later, to his chagrin. Oopsie.... 

That next Monday (which happened to be Presidents' Day), my brothers Anthony, Tyler and Robert helped to move out the bulk of my furniture. And then we painted the entire room in one coat, in one day.

Progress at noon - on all four walls!!

"Cutting in" around the edges happened first and then the rollers came out for the entire wall. I'm honestly quite surprised that we got this big of a room done in so short of a time. Later on, we discovered some patchy sections that I later touched up with a paintbrush.

If you are wondering why I'm not doing a full room picture of the painted walls, I'll give you a simple reason. My camera refused to capture the color correctly. Every single time I attempted to take a full picture, the lighting would be poor or the camera settings would be off and it would look much darker than in reality. It really is frustrating me now, but it's probably for the best if I save it for the full reveal????

Though I will be nice and share the picture of part of the wall. 


And yes, my dresser ended up right up by my bed. It was a huge tactical error on my part, that I regretted very much. 

The next step after painting the walls was painting the trim a nice bright white. Being true to my nature of doing everything the hard way, I had nixed the use of painters tape for the edges and so had to use extra paint to hide all the purple splatters on the trim. 
(Cue the I-Told-You-So chorus from my brothers).

The trim around the windows and walls took almost a week to do because I did it by myself and it was a little more tedious. The door also got a new coat of white, which greatly improved the looks of it. 

And there I finished painting! 


Or so I thought.....


Closet Wall - April 26, 2019

When I was painting, I never touched the closet. I thought I would leave it white because it was so small. Optical illusions are the best. 
(in reality, I didn't want to clean out my closet...)

Well, when it came time to clear the room for the carpet, the ugly walls got revealed for the first time. Black marks, chips and other abuse signs from almost 20 years of living in the same room really showed up. You can see some of them from the above picture.

There was no way I was leaving that. Not with the rest of the room looking so nice.

So, in the course of one afternoon, I stretched the leftover paint from the can and rollered it on the three visible walls of the closet. There wasn't enough paint to do the entire closet, nor was I cleaning out the top section to do so anyway. 


Closet - April 26, 2019

Upon reflection, painting the closet was probably a wise move. The purple looks better in the closet. Mom was right after all. 


And so ends my paint saga :)

Unless I happen to discover that the closet door is off-white and will need to be repainted. In which case, I just might scream.

And now it is your turn? How do you like the color? Any guesses as to where that Patty's Place reference came from? Have you had any "mistakes" that worked out for the best? Chat with me in the comments!


Old-fashionably yours,

Catherine


P.S. Keep an eye out - the next OVM installment is all about taking out the Peach Monstrosity otherwise known as my carpet ;)

farmlassie

Don't Take Too Much Water from the Fish Tank....

May 30, 2018


Hey y'all!!

I'm so sorry for my unexpected hiatus these past few weeks! Things have been CRAZY here...really, they have.

As of three weeks ago, I've been employed full time at a conventional dairy farm about 30 minutes from my house. It's a far cry from the living history career that I've been pursuing for the last three years, make no mistake. But, it's money in the bank and not a moment too soon, for the federal government is now demanding it's money back...

I'll be totally honest in that I definitely jumped off the deep end when taking this job. I'm working about 50-55 hours a week, 5 1/2 "days" (I get three half-days, and they are staggered), and 6 hours of sleep is now a good night for me.

And let me tell you guys, being sleep deprived and running around the house prepping for a trip is a bad combination.

This past weekend, I was getting ready to go out to Ohio for my dear friends Lia and MK's graduation at the same time my family is prepping to go on a trip in the opposite direction. My brothers were changing the water from our fish tank and they were taking a lot out.

So in my big sister admonishing voice, I told them....


"Don't take too much water out, you'll drown the fish!!"


You can imagine the response THAT got from my family.

About 9 hours later, I told Lia about that...and she laughed a lot. Little did I know the repercussions that little decision would cause.....

So day of the graduation arrives with the usual craziness of creating food trays, fighting corset strings (a friend's dress, not mine!), doing each other's makeup and hair, and enthusiastically greeting old friends. It literally felt like I had never left a year ago....

The exercises start - and so do the tears. In my defense, the drops started when one of the speakers' broke and he winked at his graduate daughter...and then continued during the presentation of gifts to moms ("I Hope You Dance" didn't help matters)....and what finished them was when the last graduate hugged his mother (who had barely survived 2 form of leukemia) after the ceremony. *still crying*

Afterwards, we had a nice brunch and hours of dancing, which included a free lesson! I leaned how to rumba and waltz a little (and want more....). 

My favorite memory from that day...will probably be Lia's graduation speech.

Her speech was sentimental and sarcastic. And you know what she ended the speech with?

"The biggest lesson that I learned is "Don't take too much water out of the fish tank or the fish will drown.""

Wise words, Lia.

Old-fashionably yours,

Catherine

farmlassie

How NOT to plan a Silver Anniversary Celebration, Part 2

April 06, 2018


Now, where was I?

Oh yes....day of the anniversary gets here. I think I mentioned in the last post that there was a nice snowstorm outside, so all of us were stuck at home, right?

Not that I sat around and twiddled my thumbs and fumed for most of the day....okay maybe only half a day.

In the early afternoon, I mixed up what was called a Silver White Cake. I broke down and used the mixer even (even though I hate using that thing, I'm a hand mixer to to the day I die...). I even made some frosting (we didn't have enough store frosting....yet another thing we never picked up.)

Everything went smoothly with the cake, and it got stuck into the oven.

Then the realization hits us at 2 pm...as one of the boys asks what are we going to do for dinner...that we realize that Mom and Dad were going to be stuck at home due to the snow.

Talk about an "Oh crap" moment. We did NOT plan for this. Now what in the world were we going to do? No way were we pulling the quick meal option, not that day?! 

Now, it providentially was my brother Tyler's turn to cook dinner that night. Tyler, while a good cook, is still a novice in the kitchen. But, with my mom out of the kitchen, we had a fighting chance.

So Tyler and I made a fast scour through the deep freezer and the pantry. We found a leg of lamb (Mom's favorite), an old recipe for a fancy macaroni casserole, enough vegetables for a salad, and even some biscuit mix.

After we shoved the lamb in the oven, I moved to get the cake out of the pans.

And what do you know.

The durned thing stuck to the pans.

I cried. Cause a stuck cake spelled disaster and crumbs everywhere. It was right about then that I texted Matthew at college with the following exchange:

yeah...I may have been a little stressed out that day. 

Mommy came to the rescue though, and managed to save the cake from being a major earthquake (thank heavens for the motherly talent of fixing things!!). Once the cake was safely deposited in the cake tray with minimal frosting cover, I set it aside to juggle macaroni, cheese and biscuit dough.

Somehow, between Tyler and I, we managed to cram all the prepping and cooking for the dinner in 3 hours without any major catastrophes....which was a miracle in itself.... 

In the meantime, my other brothers Anthony and Robert made themselves useful by cleaning up the kitchen and helping me set up the table with a new cloth and napkins. I even opened new white taper candles.

We cleaned up a little, put on some better clothes and all sat down to dinner, complete with soda for the boys and blueberry schnapps for Mom and I. (Boy did I need that schnapps....).

After dinner, I finished icing the cake. The roses were a bit of a pain - blasted frosting was very cantankously warm. I practically had to freeze it in order to get it to shape. But in all, I was very happy the way it came out.

why does it look PINK in the camera?? I assure you, it was cream. Buttercream, to be exact

So, the day ended well. We told Mom and Dad that their presents were coming, and no one was the wiser.

In the three days afterwards, I finally got the greeting card, deposited the rest of the cash in the bank and got the picture of the silver pattern. It turned out to be a pattern that had a fair selection of pieces in stock, to my relief.

In a phone conversation with Matthew, we picked 2 silver napkin rings and placed the order. Processing took about 4 days and shipping took another 5. All of us kids were on pins and needles waiting for that package to come.

But it finally did. I'm sure I looked like an idiot when I shouted for joy in my pine sappy vest and dirty skirt (I was pruning a pine tree earlier that afternoon.....) when I saw it in the mailbox.

From there, it got opened and rewrapped - with the order slip safely stored away where my dad won't find it, LOL.


And so, two weeks late, Mom and Dad finally received their silver anniversary gifts from us kids: a $25 restaurant gift card and 2 silver napkin rings. Complete with official greeting card, and unofficial note attached to the rings...with missing words and everything. *facepalm* You'd think a writer like me could actually write a note to a present with proper English...

And so completes my tale of the disastrous 25th Anniversary celebration scrape that I got myself into. My dear friends, please learn from my mistakes and plan ahead...at least a month in advance. And have a contingency plan in case you deal with a snow storm.

Old-fashionably yours,

Catherine


farmlassie

How NOT to plan a Silver Anniversary Celebration, Part 1

April 04, 2018


Hey y'all!

I assure you, I'm not dead. Just have had a LOOOONG absence.

So, an update from my personal life - I didn't get the job that I had applied to at the beginning of the month. Hence I'm back to looking again. In the meantime, I've been keeping busy around the house, writing like crazy, and trying to keep my sanity and soul intact in all the craziness we call life.

Speaking of which....I got a doozy of a story to tell y'all.....

Several weeks ago, we're just about to say family night prayers and I happen to look over to the calendar hanging on a closet door.

And made the causal remark that my parent's 25th anniversary was in 10 days.

That realization sunk in like a lead weight. As we all knelt, I'm sure my blood pressure was hitting the roof. Because Miss Melancholy Temperament had no blooming clue what her Plan was to execute this thing.

Then I looked towards the door where my brother Matthew was kneeling. As soon as he caught my gaze he mouthed to me:

"Shoebox"

It take me a minute to catch what he was saying but then it clicked and my blood pressure went back down to normal.


See, about 2 years ago right after Christmas, we kids were scheming to buy our parents a replacement washer and dryer set for their 25th anniversary...as our current set was reaching the two decade mark. Pretty ambitious for 2 kids in college and the others on a minimal allowance. Of course, we all thought that Matthew and I were going to have higher incomes 2 years down the road. In the meantime, we all chipped in what we could set aside at the time and set it in a Christmas shoebox. Which immediately got stashed under Matthew's bed (best place for it, no one would think of looking under there....LOL).

2 years went by. A little more money was stashed in the shoebox. Our 20 year dryer bit the dust and our original scheme, and the shoebox, was largely forgotten as the finances got tighter and tighter for Matthew and I.

Until that particular night at prayer.

After we finished, Matthew and I sped off and dug out that old shoebox. We counted all the cash and we had slightly more than expected (~$120). Which was a miracle of providence in and of itself!

So, the schemes began.

We came up with the following plan:

1. We would get a nice card, and include a gift card to a nice restaurant, $25 worth.
2. While they were out, the rest of us kids at home (cause Matthew had to be back at college), would decorate the house a little, have a cake, and give a little silver present.

Simple, right?

If only.....you know that proverb about best laid plans, right??

We managed to get the gift card before Matthew had to go back to college. The problem happened when trying to find the silver present.

Nothing we tried was working or clicking with us. A photographer was way too expensive. Scouring of gift websites drove us batty. Antique stores yielded only silver plate. Talk about frustrating....

So, we had to maintain semblance of daily life while attempting to find a solution.

We quickly discovered that silver, at retail prices, was a lot more expensive that we bargained for too. Which only increased our frustration levels. Deals fell through because of technicalities, and many silver items were out of our reach financially. I'm sure Matthew was ready to string me up because of the grief my perfectionist streak was giving him....

I'm sure Matthew's face mirrored this guy's at least half of the time through this whole mess....

Then finally, 5 days before the anniversary, I found Replacements, Ltd. This is a company that specializes in making replacement pieces for old silver sets. And for decent prices at that!

I knew that we had an old heirloom set in the family. All we had to do was match the pattern and order two silver napkin rings. Simple. We got this.

Only problem was I didn't have a company name or picture of the blooming silver pattern....both of which were very necessary in order to determine which pattern it was! So, I got in touch with some of the extended family to procure a picture and the company name (which was apparently easier to find than the picture...).

In the meantime, in my stupidity, I never grabbed the greeting card or deposited the rest of the cash in the bank before the actual anniversary. See, it was only going to be a quick trip, just hop and the car and go, and life has a funny way of getting in the way all of a sudden...

And yeah, that came back to bite me, big time.

Dad snitched my car cause his was in the repair shop for two days. The two days before the anniversary, of course. Great timing...oh well, there is always the day OF the anniversary right?

RIGHT.

You know what came the night?

A snowstorm. A bad snowstorm. Of course it would. There is over 8 inches of snow outside in the morning, the roads are a mess, snow is falling very finely very steadily (anybody that has lived up in the North KNOWS that that means lots of it).

Perfectly. Squashed. EVERYTHING.

*insert frustrated scream*

But that's not all, of course it isn't....you think that's all?

Keep your eyes peeled for part 2!

Old-fashionably yours,

Catherine

Send Me a Message!

Name

Email *

Message *